|
|
||||||||||||||||||||||||||||||||||||||||||||||||||||||||||||||||||||||||||||||||||||||||||||||||||||||||||||||||||||||||||||||||||||||||||||||||||||||||||||||||||||||||||||||||
Game Charting Insights: Contested ReboundsRebounds have a wide range in degree of difficulty, and so this exercise is designed to begin to understand the frequency of contested rebounds versus uncontested ones, and to make distinctions between them. We also can look at the impact of shot location on rebounds, shot clock timing, and other facets of hitting the boardsProject scope: we'll be tracking "contestedness levels" as well as shot location and rebound location. This is admittedly venturing into much more subjective territory, but charters tracked:
A) how many players for each team were in the vicinity of where the ball went for the potential rebound, and In essence how many guys are in reasonable range to get a chance at it -- eg guys might be posting up on the left side ready to grab the rebound but if the ball bounces out to the right they are not contesting the rebound since they're not close to the ball. On the other hand a player may be in position, blocking out, etc and just failed to jump or had the ball go past them.
uncontested -- 1 or more players for one team, 0 players in range for the other team Here's how the splits turned out from our sample:
Now you may be wondering how can the uncontested rebounds not always go to the team with the only player going for the rebound? and the answer is that you're dealing with the classic dropping the ball out of bounds/stepping out of bounds maneuver. Aside from that, the points that seem to jump out from this are:
Still it does seem clear that the range of difficulty when it comes to rebounds is pretty large. A more substantial rebounding rating should then look at the specifics of a rebound and not just count them all as one more tally in the scoresheet. Another implication may be that not sending anyone to the offensive glass could be a mistake, since even when outnumbered the offensive team grabs the ball at a pretty healthy clip. Of course a true answer to this requires looking at "sending guys to the glass" versus the ensuing possession for the former defensive team in the event your 'sent guys' don't corral the rebound. Let's move on now to looking at the details of the type of shot versus frequency of being contested.
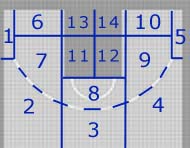
Basically zones 1 to 5 are three point locations, 6 to 10 are two point zones outside the paint, and zones 11 to 14 are in the paint. For any backcourt events we use a "-1" zone, and once in a while you get a "zone 0" for deep frontcourt events (like a foul crossing halfcourt or something)
Three-Pointers -- self explanatory really, zones 1 to 5 on our map ...and also show the overall "contested" percentages where each team had at least one player in range to go for the rebound. THREE-POINTERS
TWO-POINT JUMP SHOTS
IN THE PAINT
So no shock here, but the "in the paint" shots lead to more contested rebounds, and the highest offensive rebound rate, with three-pointers being close, but those pesky two-point jumpers from outside, which we've picked on in other articles, are once again the least effective for the offensive team in terms of producing second chances! We're only showing the three groups here, but as you might expect, there are differences between a baseline shot and say a similar distance shot from the wings. Now one supposed quality of great rebounders is knowing where the ball is likely to go if it misses, and we can provide some data on that...
We'll again use the fourteen zone scheme for both where a shot was taken from and where it was rebounded, but grouping zones for ease of analysis into:
Long rebounds -- all three point zones (1 to 5) and the straightaway two from the free throw line (zone 8) In addition, we'll track a left/right skew for the medium/short zones, which is:
Left -- zones 6, 7, 11, 13
So yes, the three point shots produce more medium and long rebounds, especially from the wings and straightaway. More importantly there's strong evidence that long range missed shots tend to go beyond the basket, so a left side three point shot ends up in a right side zone and vice versa. Now our sample sizes aren't great which probably explains some of the inconsistency in certain mirror image zones. Furthermore a bank shot probably has a markedly different "miss spray" then a straight at the hoop attempt. This is something that may be worth addressing over a full season of shots, at which point you can also start digging into the tendencies of specific players.
An interesting parallel may be what is being done in baseball for fielding ratings by our friends at PROTRADE and other places -- with data on the path of every batted ball, strength and height, they can then draw up averages as to how often a ball hit in a certain way has "typically" been converted into an out, a single, a double, etc and grade players versus their performance on "similar" fielding opportunties compared to the rest of the league. This makes sense in the NBA to some degree since rebounding involves not just leaping and timing, but also positioning, blocking out, judging the flight of the ball, etc which are all captured reasonably well in the above, but as we also mentioned earlier it may not fully reflect everything that's happening. Still, it would be a worthwhile starting point. You want to see these kinds of individual player rebounding stats? So do we...stay tuned!
Also see: Next up: touches and dribbles!
Game Charters for the "Contested Rebound" Project:
Thanks as always to the noble efforts of the charters -- they are the ones who will be pushing NBA statistical analysis to new heights!
Interested in doing some game charting? Send a message to:
charting@82games.com
|
||||||||||||||||||||||||||||||||||||||||||||||||||||||||||||||||||||||||||||||||||||||||||||||||||||||||||||||||||||||||||||||||||||||||||||||||||||||||||||||||||||||||||||||||
|
|
Copyright © 2006 by 82games.com, All Rights Reserved